Sudoku Solving Techniques
Seven techniques for when the obvious moves run out, from naked singles to Swordfish, plus a trial-and-error fallback and tips for solving faster.
Play SudokuNew to Sudoku? The Sudoku hub covers the basic rules. This guide assumes you already know them. What follows are seven techniques, roughly in the order you'll reach for them, for the point in a puzzle where scanning for an obvious next move stops working and you need an actual chain of reasoning to make progress.
Every technique below works the same way: start from the digits already on the board, narrow down what each empty cell could still legally hold, and look for a cell or a group of cells whose remaining options are forced by the digits and candidates around them. None of this requires guessing: a well-formed puzzle can always be finished by deduction alone, and PuzzIt only ever generates puzzles with exactly one solution. Once you've got them down, a trial-and-error shortcut and some general speed tips follow at the end for when deduction alone is taking too long.
Naked single
A naked single is the simplest deduction in Sudoku: a cell with exactly one legal digit left once its row, column and box are all accounted for. If those three units already contain eight of the nine digits between them, the ninth is forced, since there's nowhere else for it to go.
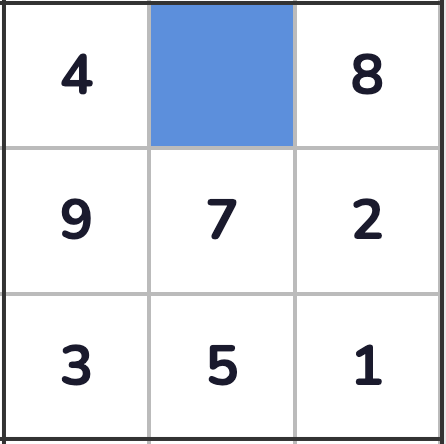
The clearest case is a box that's one cell short of complete. In the figure below, the box already holds 4, 8, 9, 7, 2, 3, 5 and 1 in its other eight cells, so the blank cell can only be 6, whatever the rest of the grid looks like.
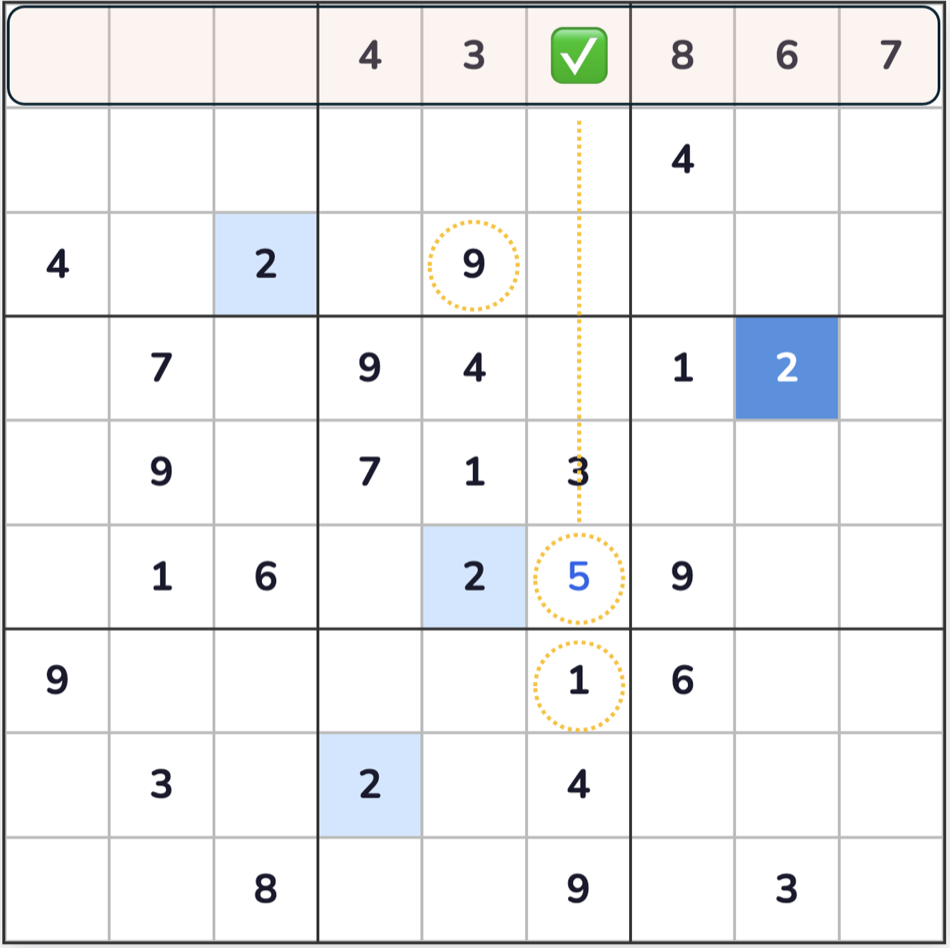
Naked singles rarely come from a box alone, though. Just as often the missing digit is forced by its row and column too, even when its own box isn't close to full. In the figure below, row 1 alone leaves 1, 2, 5 and 9 as candidates for R1C6. The top-middle box (rows 1–3, columns 4–6) already holds a 9 at R3C5, ruling it out; column 6 already holds a 5 at R6C6 and a 1 at R7C6, ruling those out too. That leaves 2 as the only digit R1C6 can still be, forced not by any single unit but by all three working together.
Either way, the test is the same: count what's missing across all three units, and if only one digit remains, place it. Scan for naked singles after every placement: filling one cell can turn its neighbour into a naked single in turn, and a short chain of these is often enough to open up an easier puzzle almost on its own.
Hidden single
A hidden single looks different from a naked single but proves the same kind of fact from the other direction. Instead of asking "what can this cell be", you ask "where can this digit go" within a row, column or box, and if the answer is exactly one cell, that digit belongs there, even if that cell still has other candidates sitting alongside it.
This is the technique beginners miss most often, because the forced cell doesn't look forced. It might have two or three other digits still pencilled in, so a naked-single scan walks straight past it. The only way to catch a hidden single is to pick a digit and a unit, say "where can 1 go in this box", and check every empty cell in that unit in turn, rather than checking every cell for every digit.
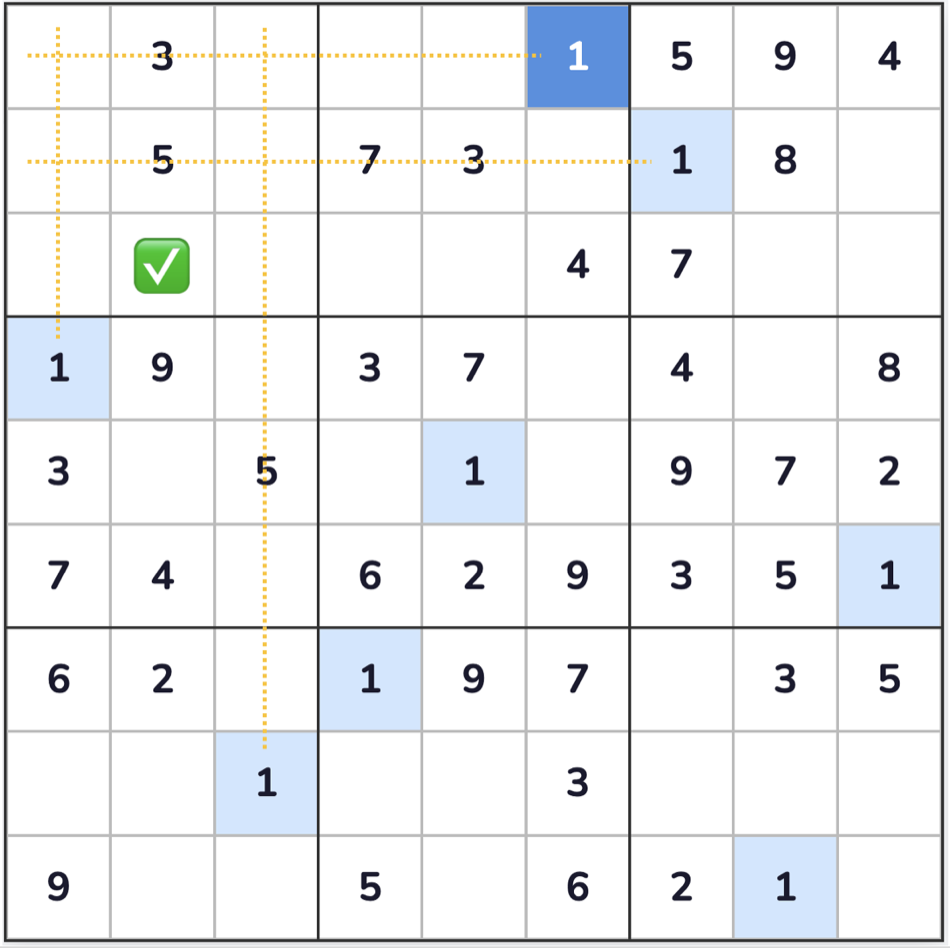
In the figure below, box 1 (rows 1–3, columns 1–3) is missing a 1. Existing 1s at R1C6 and R2C7 rule out the rest of rows 1 and 2 within the box; existing 1s at R4C1 and R8C3 rule out the rest of columns 1 and 3. That leaves exactly one cell, R3C2, that can still take a 1: a hidden single, hiding behind whatever other candidates that cell also carries.
Pointing pair
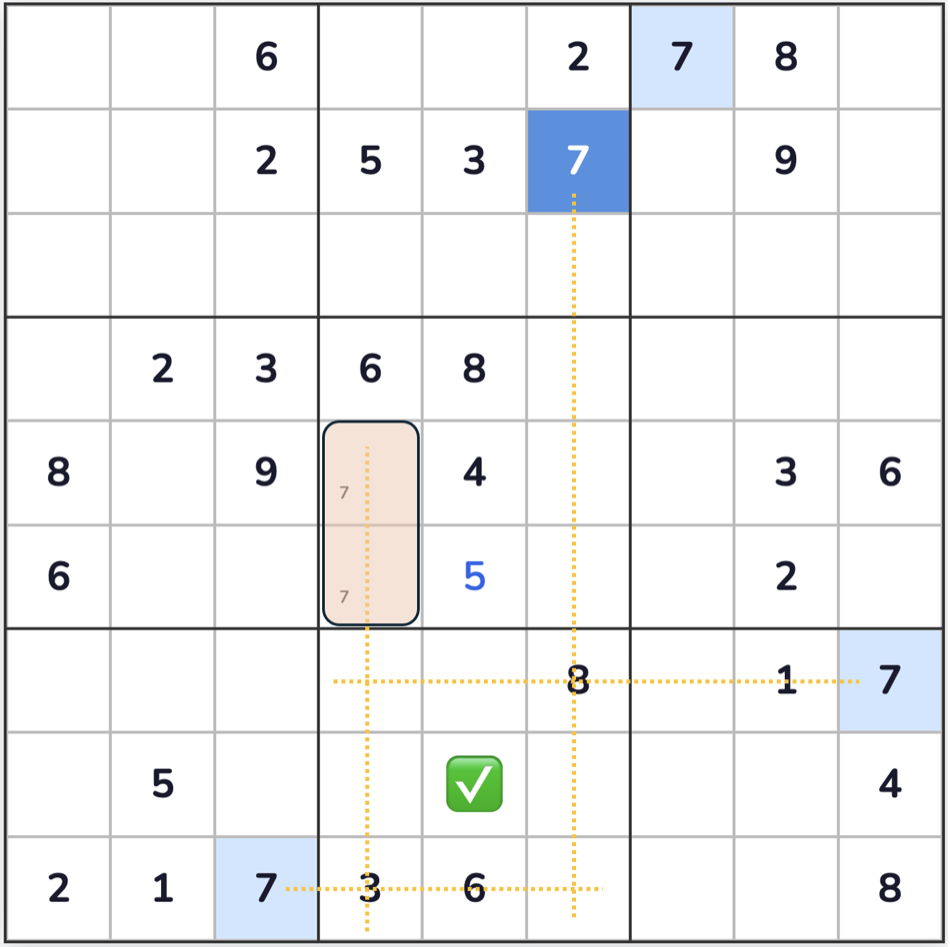
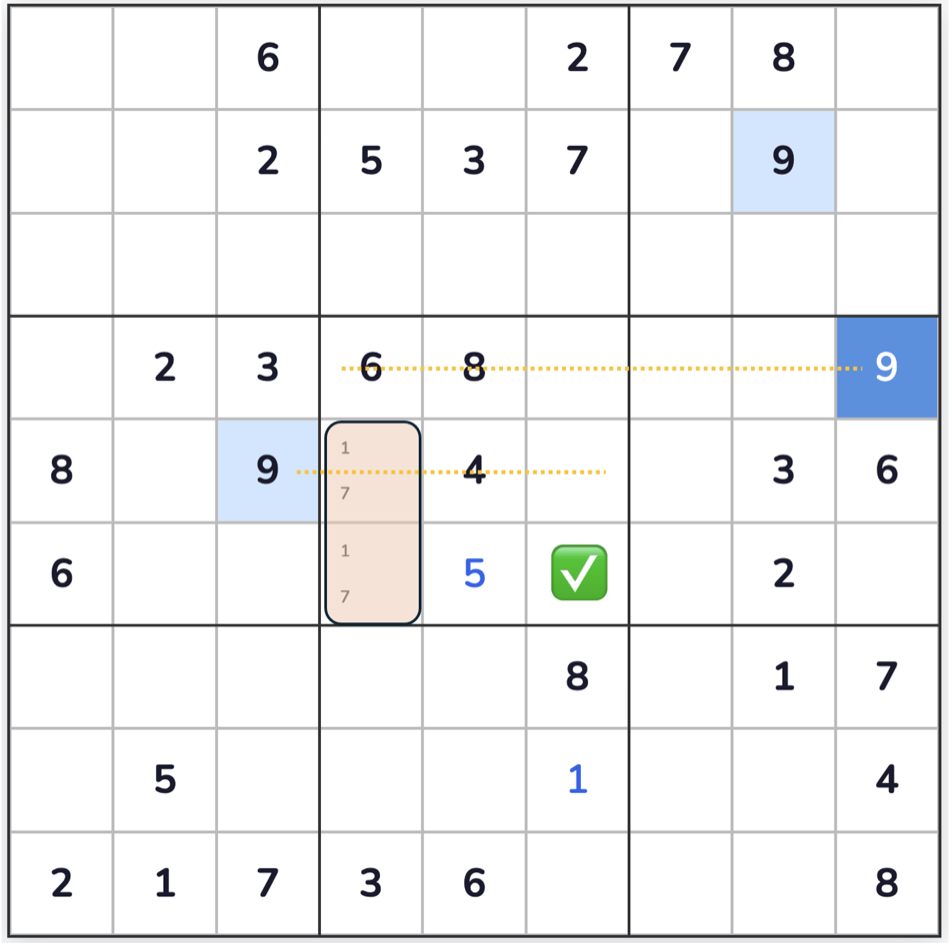
A pointing pair connects a box to a line running through it. In the figure below, the centre box (rows 4–6, columns 4–6) has only two candidates for 7: R5C4 and R6C4, both in column 4.
Since both live in column 4, the rest of that column can never hold the centre box's 7, ruling it out at R7C4 and R8C4 in the box below (rows 7–9, columns 4–6). Combine that with a couple of existing 7s elsewhere: row 7's own 7 at R7C9 rules out R7C5, and column 6's 7 at R2C6 rules out R8C6 and R9C6. Only R8C5 is left: a hidden single, unlocked entirely by the pointing pair above it.
The same logic works turned ninety degrees: two candidates confined to a row instead of a column, blocking the row instead. And it isn't limited to pairs: three candidates confined to the same row or column within a box block that line just as completely.
Naked pair
A naked pair is the next step on from a pointing pair. Instead of confining a digit to a line, it strips candidates from an entire unit outright. It happens when two cells in the same box, row or column both carry the exact same two candidates and nothing else. Picking up R5C4 and R6C4 from the pointing pair above, once their notes are filled in they turn out to hold nothing but 1 and 7.
Between them, those two cells have to use up both 1 and 7. You don't yet know which cell gets which, but neither digit can be hiding anywhere else in the centre box. That rules out 9 at R5C4 and R6C4 too, and existing 9s elsewhere in the box's rows, R4C9 and R5C3, rule out R4C6 and R5C6. That leaves only R6C6 for the box's 9: a hidden single, unlocked entirely by the naked pair.
The pattern extends to naked triples and quadruples too: three or four cells confined to exactly three or four shared candidates lock those digits out of the rest of the unit the same way.
Box-line reduction
Box-line reduction is a pointing pair worked in the other direction. Instead of a box confining a digit to a line, a line confines a digit to a box: if every cell in a row or column that could still hold a digit sits inside the same box, that digit can be eliminated from the rest of that box.
The two techniques are often taught together because the elimination logic is identical, just aimed the opposite way: one starts from a box and clears a line, the other starts from a line and clears a box. Once you're comfortable spotting a pointing pair, box-line reduction usually falls out of the same scan: whenever you notice a digit confined to one row or column within a box, it's worth checking the reverse case too, on any row or column that looks similarly short on options.
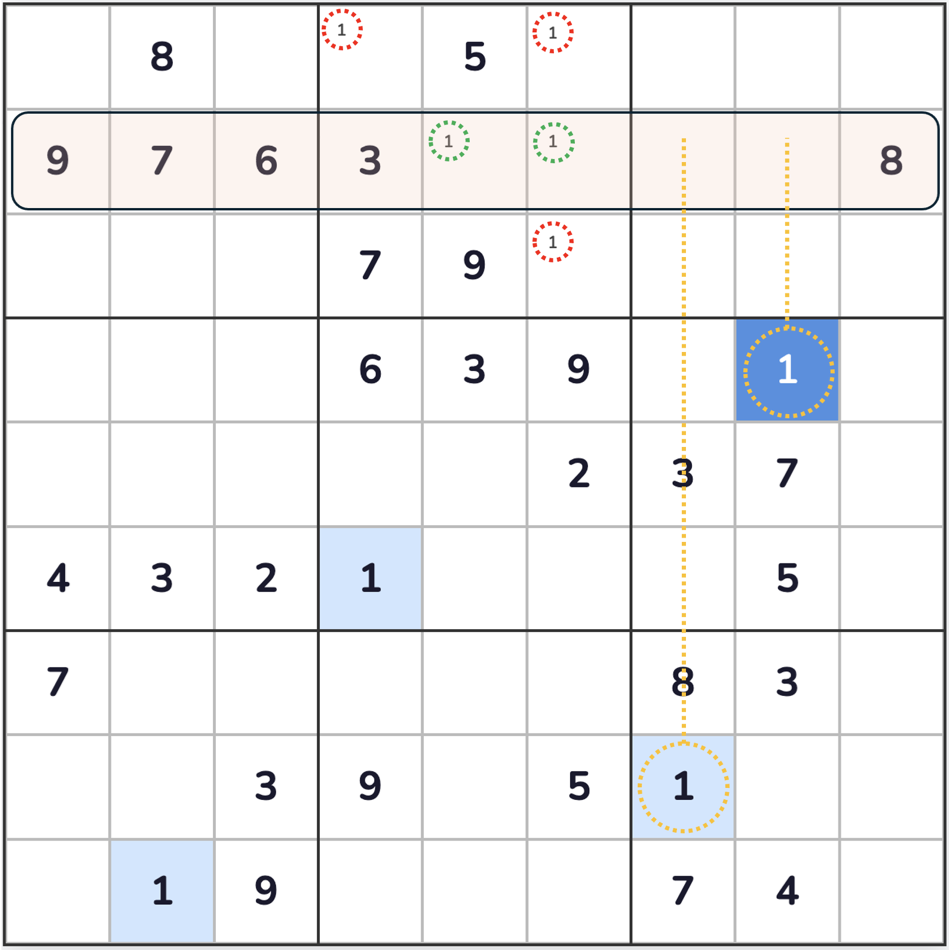
In the figure below, row 2's only remaining candidates for 1 are R2C5 and R2C6, both inside the top-centre box (rows 1–3, columns 4–6), and existing 1s further down columns 7 and 8, traced by the dotted lines, already rule 1 out of the row's other two blank cells. That confines the row's 1s to the box, so 1 can be crossed off every other blank cell in it: R1C4, R1C6 and R3C6.
X-Wing
X-Wing is the first technique on this list that reasons about candidate positions across the whole grid rather than within a single box or line, and it's usually the point where a puzzle stops feeling like simple bookkeeping and starts feeling like a genuine logic puzzle.
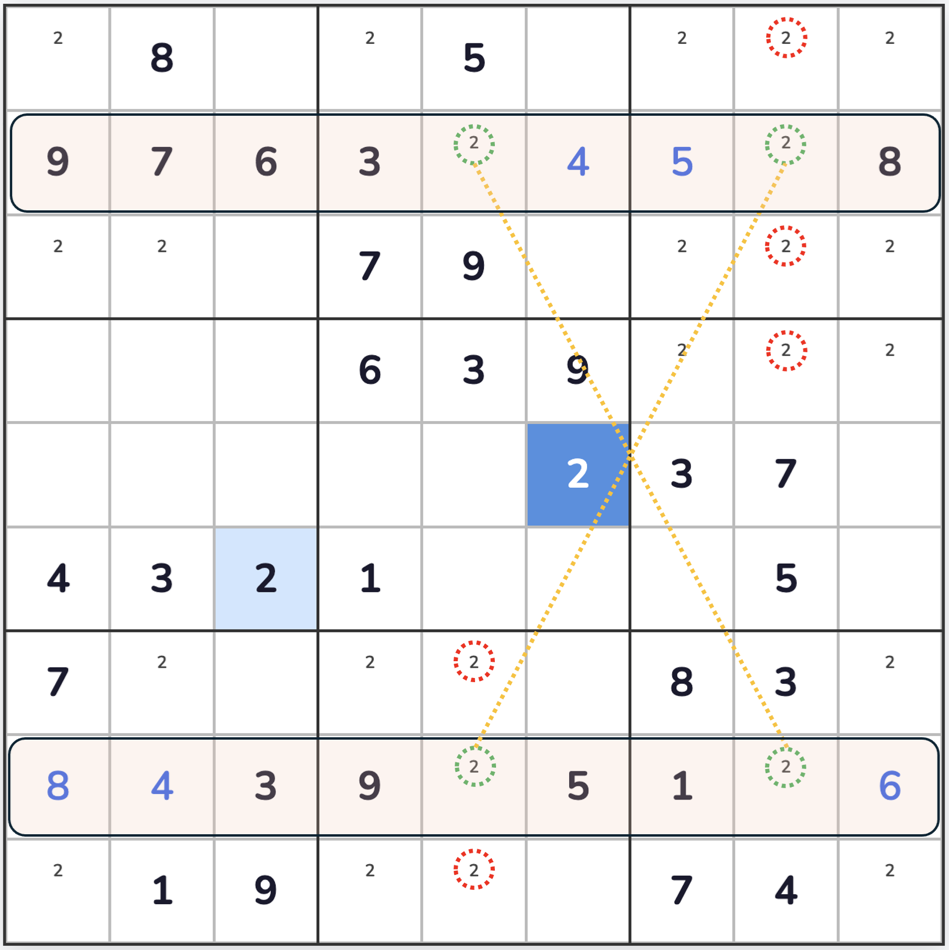
Look for a digit whose only candidates in two different rows both fall in the same two columns. In the figure below, row 2 is otherwise full: its only two candidates for 2 sit in columns 5 and 8. Row 8 has run dry the same way, with its only two candidates for 2 also in columns 5 and 8. Those four cells form a rectangle: two corners in row 2, two in row 8, sharing exactly the same two columns.
The 2 has to occupy one full diagonal of that rectangle or the other, since there's no third arrangement that satisfies both rows at once. Whichever diagonal turns out to be correct, every other cell in columns 5 and 8 is guaranteed not to hold a 2, so it can be eliminated from the rest of both columns: R1C8, R3C8 and R4C8 in column 8, and R7C5 and R9C5 in column 5, however far from rows 2 and 8 those cells sit.
The same pattern reads the other way too: two columns whose only candidates for a digit fall in the same two rows, with eliminations running along the rows instead. Either direction, the key habit is tracking one digit's candidate positions across the whole board rather than cell by cell.
Swordfish
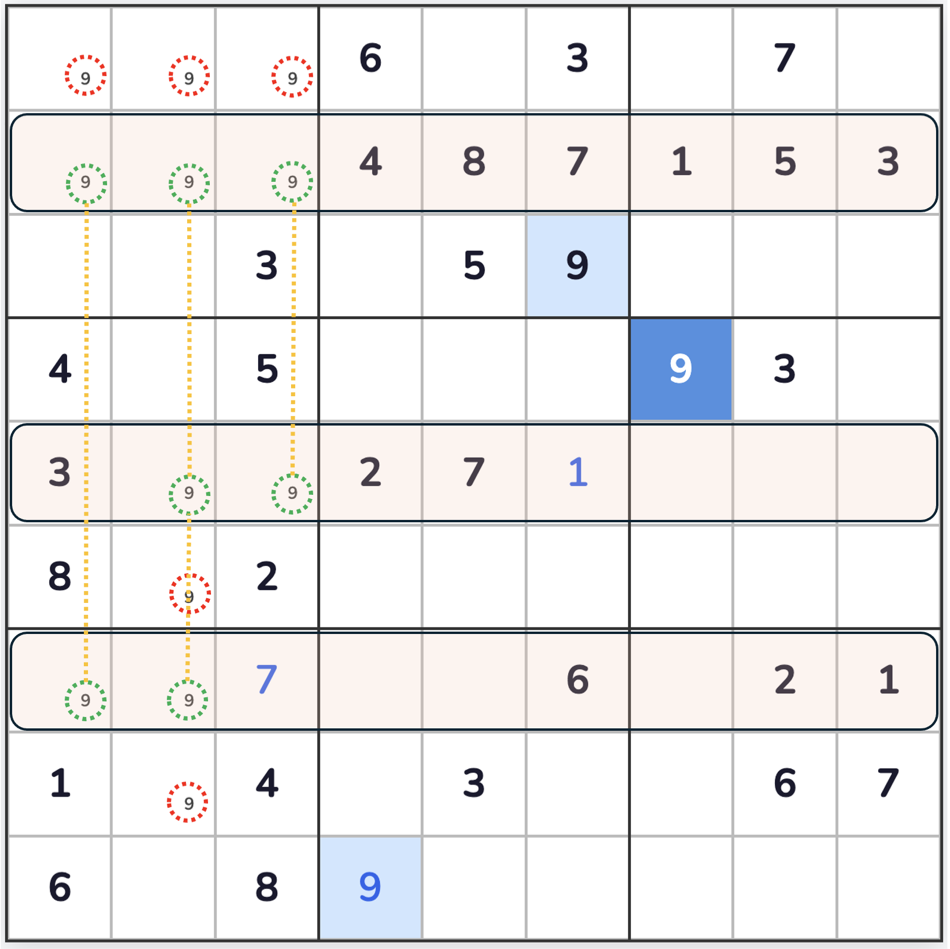
Swordfish is an X-Wing stretched from two rows and two columns to three of each. In the figure below, digit 9's candidates across rows 2, 5 and 7 all land inside columns 1, 2 and 3: row 2 has candidates in all three columns, row 5 only in columns 2 and 3, and row 7 only in columns 1 and 2, but between them nothing spills into a fourth column.
That's the detail that trips people up: a Swordfish doesn't need a clean two-per-row grid the way an X-Wing does. One row can be short a candidate, as long as none of the three rows spills into a column outside the shared set. As long as all of a digit's candidates across three rows are contained within the same three columns, that digit is locked into some assignment across those nine intersection cells, and every other cell in those three columns can have it eliminated: R1C1, R1C2 and R1C3 in row 1, plus R6C2 and R8C2 further down the grid.
It's rarer than the other six techniques here because it takes three aligned rows to set up, and spotting it usually means working systematically through a digit's full candidate map rather than stumbling onto it by eye. When a puzzle's hardest difficulty genuinely needs it, though, it's often the only thing standing between a solved grid and a guess.
Trial and error with probability
Some puzzles, expert difficulty especially, leave so few visible clues that deduction alone can stall for a long stretch. When that happens, PuzzIt's Undo button makes an informed guess worth trying:
- Pick a cell with only two candidates.
- Choose one of the two and solve forward in your head a few steps. Whichever choice keeps opening up new deductions is the one to commit to.
- Keep solving from there. If the grid ever becomes unsolvable (a unit left needing two of the same digit, or a cell with no candidates left), the digit you picked was wrong, and the other candidate has to be correct.
- Undo back to the guess and place the other candidate instead.
The upside is you skip hunting for a hidden clue that might take a while to spot. The catch is that every move after the guess has to be correct, or the contradiction you're relying on won't show up where you expect it.
Other tips for solving faster
With deduction and trial-and-error both in your toolkit, a few habits make either one faster:
- Chase the chain reaction. Every time you place a digit, check the row, column and box it touches for a fresh naked or hidden single before moving on: one placement often unlocks the next, and a whole run of cells can fall from a single deduced clue.
- Solve systematically. Pick a rhythm and stick to it: work digit by digit (1 through 9, then back to 1), or unit by unit (whichever row, column or box currently has the most clues). Either way, staying systematic beats jumping around the board at random.
- Practice. The more you play, the faster you'll recognise these patterns on sight.
Putting it together
None of these seven techniques is exotic: every one of them is pure elimination, applied a little more broadly than the last. Naked and hidden singles work within a single box, row or column; pointing pairs, naked pairs and box-line reduction connect two units at a time; X-Wing and Swordfish reason about one digit's candidates across the whole board. Work through them roughly in that order on a stuck puzzle, from the smallest and most local deduction to the widest, and a grid that looked stuck usually starts moving again well before you reach the end of the list. And if it's still stuck once you've worked through all seven, or the clues are simply too sparse to deduce from, the trial-and-error method above, backed by Undo, will get you the rest of the way.